
|
Circles, Spirals and SunflowersA Processing.js tutorial by Jim Bumgardner 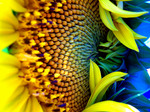
D (diameter) = 2 R
C (circumference) = 2 π R (or π D)
A (area) = π R2
While these equations are useful, they aren't actually needed to draw a circle. We'll make use of them in a surprising way, below. To draw a circle or anything, we are going to need a graphics framework. I'm going to use Processing.js. There is another version of this tutorial which uses the HTML5 Canvas directly, without Processing.js. Processing.js uses the HTML5 Canvas APIs under the hood. Therefore, if you are using an older web browser, like IE 8 or earlier, you're not going to see anything! Example 1 shows a basic black circle. I've made the code longer than it needs to be, to make it readable. Here's what it looks like. size(100, 100); smooth(); background(255); float cx = width/2; float cy = height/2; float diameter = width*.9; fill(0); ellipse(cx,cy,diameter,diameter);The most complicated piece of this is the ellipse function, which is used to draw circles and ovals. Its parameters are
Example 2 shows a more complicated taijitu figure drawn using multiple filled circles (and one half circle). This is a more advanced example and can be skipped for now. If you're curious about it, click on the link for example 2 and scroll to the bottom of the code to read more about it. Later, try reproducing it without looking at the code.
Note that if you use stroke() instead of fill(), you get an outlined circle, which looks like example 3. At this point, I would suggest, as a hands-on exercise, that you construct a sample web page that draws a circle using Processing.js. You can use my 'example 3' code as a starting point - click on one of the examples and do a "view source" to see what's going on. After that, take a break and come back when you're feeling fresh!
 Feeling refreshed? Great. You may be curious how the points on these circles are plotted. In example 4, I've drawn a large circle out of small circles, like a black pearl necklace. The are a number of ways to figure out how the points lie on a circle, but I usually use the sine and cosine functions to do it. I think of these functions as "circle drawing" functions. The basic equations are:
x = cx + cos(θ) R
y = cy + sin(θ) R These are the classic equations for converting from polar coordinates (angle and distance from some center point) to cartesian coordinates (x and y). In these equations, cx and cy are the center point of the circle, R is the radius of the circle, and theta (θ) represents the angle going around the circle. In code, you usually supply the angle in radians, not degrees. The more familiar degrees go from 0 to 360. Radians go from 0 to 2π. To convert a number from degrees to radians, multiply it by a scaling constant (π / 180), or just use the radians() function which is built into Processing. Note that the angle value you pass to sin and cosine doesn't need to be restricted to 0 to 2π - you can keep going around the circle in either direction. sin(θ) will produce identical values for any two numbers which are 2π apart. The pattern produced by these functions are sine waves and cosine waves (cosine waves are basically sine waves which are out of phase by 90 degrees). In Processing.js, I employ these equations in a loop, to draw each point on the circle, like so:
for (int i = 1; i <= nbr_circles; ++i) {
  float angle = i * TWO_PI / nbr_circles;
  float x = cx + cos(angle) * lg_rad;
  float y = cy + sin(angle) * lg_rad;
  ellipse(x, y, sm_diam, sm_diam);
}
In this code, lg_rad is the radius of the large ring, and sm_diam is the diameter of the smaller circles I am drawing in the ring. In order to make the circles just big enough to touch, I worked out the circumference of the large circle, and then divided it by the number of circles in the ring. This is the diameter of the smaller circles. float lg_diam = width * .85; // large circle's diameter float lg_rad = lg_diam/2; // large circle's radius float lg_circ = PI * lg_diam; // large circumference float sm_diam = (lg_circ / nbr_circles); // small circle's diameter By changing the value of nbr_circles, I can increase or decrease the number of circles in the ring, as in example 5. Try hitting the play button on this example - you'll see the circles get smaller as I increase the number with each frame. If I make the circles small enough, it closely resembles the circular outline in example 3. At those sizes, it would be far more efficient to draw individual pixels, rather than little tiny circles! While you take a break, consider how this code could be modified to draw a spiral instead of a circle...
 Have you figured it out? The basic idea is that you change the value of the larger radius (what I was calling lg_rad) as you draw each point. Take a look at the pertinent lines of code in example 6. In this example, as each dot is drawn, at an ever increasing radius, I also increment the angle by just 2 degrees.
We can tighten the spiral by changing the amount we increment the angle during each step, as in example 7. Hit the play button to see the effect. In this example, we start at a 2 degree increment, and then increase the angle by 1 degree per second (since there are 100 dots, the outer dot travels at 100 x 1 degrees or 100 degrees per second).
Between those starfish, which are produced by rational fractions of the circle, you get the rose-like patterns, in which the dots don't make straight spokes. You get these rose patterns when the angle increment is an irrational fraction of the full circle. Mathematicans have demonstrated that there are far more irrational numbers than rational ones, and intuitively, you can see that there are more roses than starfish in the animation. There are a number of irrational angles that look especially nice (try the square root of 2 times π or 4.442). The one that produces the most optimal packing, and corresponds to the familiar sunflower arrangement is an angle of approximately 222.5 degrees (or 137.5 going the other way). This is the golden angle, and it is closely related to φ (phi), the golden ratio. More precisely:
φ = (sqrt(5) + 1) / 2 - 1
golden angle = 360 φ degrees, or 2 π φ radians
If we use that angle to produce a spiral, we get one of these! Example 8 is sometimes called a fibonacci spiral, because the golden ratio is closely related to fibonacci numbers. I also call these phyllotaxy spirals, because the golden angle appears a lot in plant growth (it optimizes surface area to sunlight). Once you start noticing it, you'll see it in a lot of plants in addition to sunflowers, such as pine cones and agaves.
 In the above example, you may have noticed that the dots are kind of tight in the center, and then get progressively further apart as they go out. This is because the radial increment is constant, or linear. It would be cool if we could figure out how to get them to pack tightly, like the seeds of a sunflower. It turns out, we already have the mathematical tools to accomplish this! Consider a large circle which is made up of a bunch of tightly packed little circles - circles so tightly packed that no space remains. If all those little circles are the same size, and the area of the large circle is A, then the area of the little circles, B = A/N, where N is the number of little circles. As we grow a phyllotaxy spiral, at each step M from 1 to N, we make something very like a circle made up of M tiny circles. The area of that circle is B*M. Since we know that area = π R2, we can deduce the desired radius from the area. R = sqrt( area / π ) We can use this technique to figure out (given the number of circles we wish to draw, and the size of the outer circle) both the size of the small circles, and how far out to draw each one. The math for working out the expanding radii isn't perfect, because there is a little space left over after the cicles are packed together. To compensate for that, we use a fudge factor which keeps the circles from overlapping by drawing them slightly smaller. I find drawing 87% of the perfect size works fine. This produces this figure.
To get even closer to a sunflower, we can make the circles grow larger as they grow outward. One way to easily accomplish this is by making the outer circles grow exactly the same amount as the inner circles shrink, so that cumulatively, the area of the circles remains the same. Here is an example. Finally, we can use the processing variable frameCount to produce some cool animation effects with these patterns. Click and scroll to the bottom of example 11 for more info about how I did the color cycling. Have fun! The next tutorial in this series is Double Rainbow All The Way!. By the way, if you are in the Los Angeles area, I'll be teaching a couple of graphics and music programming workshops in Culver City, using the Processing language, in the next few weeks. More info here.
Privacy Policy Contact krazydad Discord server |